How to schedule Instagram Reels from Notion
Your Reels are already planned in Notion. Here's how to make that same row publish them: the account Instagram requires, the video and cover it accepts, where the caption goes, and how to batch a week of Reels in one sitting.

Most Reels start life as a line in a Notion database: an idea, a hook, a note to film it on Thursday. Then the finished video sits in a downloads folder until someone remembers to open Instagram, paste the caption back in, pick a cover and press Share. This guide closes that gap. The row that planned the Reel becomes the thing that publishes it.
Can you schedule Instagram Reels from Notion?
Yes, as long as something connects the two. Notion holds the Reel well: the video in a files column, the caption in the page, the date you want it live. What Notion can't do is talk to Instagram. It has no publishing feature, so on its own the row is a reminder, not a schedule. Connect the database to a scheduler that uses Instagram's official API and the row itself goes out: the video is published as a Reel at the time in its date column, with the caption from the page, the cover you attached and, if you want, a first comment underneath. Instagram sets two conditions for any tool that does this: the account has to be a Business or Creator account, and the video has to be uploaded as a real file. Both take a minute to sort out, and nothing else about how you plan has to change.
What does Instagram need before a Reel can be scheduled?
Four things, and only the first takes any setup.
- A Business or Creator account. Instagram only lets scheduling tools publish to professional accounts. Switching is free and takes two minutes in the Instagram app (Settings, then Account type and tools). You don't need a Facebook Page for it.
- A video file Instagram takes. MP4 or MOV, at least 3 seconds long, up to 1 GB and up to 1920 pixels tall. Export it vertical, 9:16, so nothing is cropped in the Reels feed, and keep it under about 90 seconds: a longer video can publish as a regular video rather than a Reel.
- A caption under 2,200 characters. That includes hashtags. Instagram counts emoji and line breaks too, so leave yourself some room.
- A cover, if you want to choose it. Instagram takes a JPEG. Without one, it picks a frame for you, and it rarely picks the frame you would have.
None of this is specific to Notion. It's what Instagram asks of every tool that publishes on your behalf, which is why it's worth getting right once.
How do you set up a Reel row in Notion?
One row is one Reel. If you already plan content in a Notion content calendar, you don't need a new database: Reels are rows like any other post, with a video where a photo would be.
Here is what goes where:
- The name is just for you. "Reel: batch day in 30 seconds" tells you what the row is when you scan the calendar.
- The caption is the page itself. Open the row and type below the properties, like a note. It's sent as plain text, so bold and headings are left out; line breaks and emoji go through.
- The video goes in the media column. Upload the file itself. A link to a video hosted on Google Drive or Dropbox won't publish, because Instagram fetches the file, not the page around it.
- The cover goes in the thumbnail column. This is the image people see on your grid and in the Reels tab. A JPEG at 9:16 is the safe choice.
- The date and time go in the date column, with "Include time" turned on.
- The first comment is optional. It's where some people keep hashtags, so the caption stays clean.
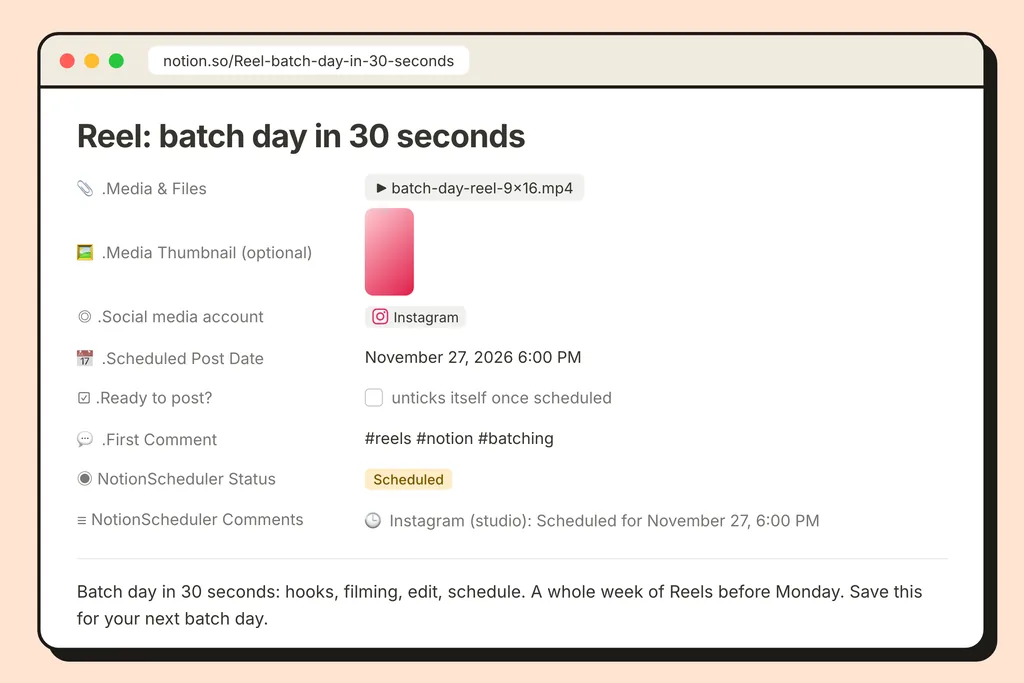
Then tick the box that marks it ready. That's the moment it's scheduled: in about a minute the row shows Scheduled, and at the time you picked it turns Posted. You can still edit the caption, swap the video or move the date after that. The row is read again right before it publishes.
How do you pick a cover that works on the grid?
The cover does two jobs. In the Reels tab it's shown full-height at 9:16, and on your profile grid it's cropped to a 3:4 portrait from the centre. A cover that only works at one of those sizes will look off at the other.
Three habits help:
- Keep the important part in the middle. Text and faces near the top or bottom edge get cut on the grid.
- Make it a still, not a frame. A frame grabbed from the video is usually mid-motion and blurry. Export one clean still from your editor, or design a simple title card.
- Check it against the grid before it goes out. If you plan your feed in a gallery view that previews the grid, put the cover in the property the gallery shows. You'll see how the new Reel sits next to the last few posts before anyone else does.
How do you batch a week of Reels in one sitting?
Reels take longer to make than photo posts, so they benefit the most from batching. The trick is to split the work by stage rather than by video, the same way you would plan and batch TikTok content:
- Write all the hooks first. One sitting, one list, one row per Reel. A board view grouped by stage (Idea, Filmed, Edited, Scheduled) shows where each one is.
- Film everything in one session. Same light, same outfit, same setup. Switching context between videos is what eats the time.
- Edit in one pass, exporting each video at 9:16 straight into its row.
- Write captions and covers last, when you can see all the videos side by side and spread the topics across the week.
- Date them and tick them. Each Reel goes out on its own day, and your week of Reels is done before Monday.
If the same vertical videos also go to TikTok or YouTube Shorts, don't duplicate the rows. Tick several accounts on one row and the same video goes out on each of them, with the caption you wrote. Our guide to repurposing one idea across platforms covers when to adapt the caption per platform instead.
Can you schedule Instagram Stories from Notion too?
Yes. A Story uses the same row, with one extra checkbox that marks it as a Story instead of a Reel. Story videos are shorter (up to 60 seconds) and take no caption, and you can only publish one Story per row. Everything else, the date, the account and the status, works the same way.
What can go wrong, and how do you see it?
Most failed Reels fail for one of three reasons: the account isn't a Business or Creator account, the video is a link rather than an uploaded file, or the file is outside Instagram's limits. Most of that is checked before anything is sent, and the row says what's wrong in plain words in its comments column. Fix the row, tick it again, and it's rescheduled.
The second thing worth knowing: once a Reel is posted, its views, likes and comments can be written back into the same row, so the database that planned the Reel also tells you how it did. The Instagram scheduling page lists everything else Instagram supports, from carousels to first comments.
The takeaway
Scheduling Reels from Notion is less about a new tool and more about not leaving the place where the Reel was planned. Put the video, the cover and the caption on the row, pick a time, tick it. The free plan covers Instagram, so you can try it on a single Reel before moving the rest of your week over, and the getting started guide walks through each column.